Grow Your Own. Life on the Ranch.

Living on a ranch has it’s down sides.

The Generator.

The Genorator

Whenever I we drive up to it, I see this…

Remember this furnace in Home Alone? Kevin is a child left behind (on accident) to fend for himself while his family goes on a Christmas vacation. His arch enemy in the house is the basement furnace that periodically laughs and heckles him. It’s quite scary. Until finally Kevin gets fed up with his childish fear of the furnace and yells, “Shut-uuuup!”. Immediately the furnace becomes inanimate and Kevin nods his head approvingly as he calmly walks back upstairs.

That’s how I feel whenever I’m in the presence of the generator.

It’s really loud.

It’s really smelly.

It’s basically the equivalent of a semi-truck engine and you have to start it with a little switch located on the generator. Yikes! The worst part is that starting it is the only way I can run my space heater and come summer, the AC. Fortunately, we installed a propane heater for the time being, but there are times when it needs to be started. Most of the time the ranch operates on a battery bank. Think 10 car batteries. A few hours in the morning and a few hours at night my father-in-law starts up the generator to charge the batteries and to provide more electricity so we can do things like the laundry and vacuum. The batteries just aren’t strong enough to power those things without being completely drained. It’s happened a few times so far, where I’ve been home on a Saturday and left the lights in the shop on and the batteries were drained. The lights in the house start to pulse on and off to let us know that they are low. Only thing to do is either turn off all the lights… or start the generator. Which one do you think I do? Someday I will have to face my fears, but that day is not today. But I promise to get video if it ever happens.

***

Now onto the sunnier side of ranch life. We are finally starting to get projects done, even during tax season. With Phillip working 6 days a week (CPA), it’s hard for me to get any projects done around here alone. I do as much as I can without the muscles and the know-how, but I don’t get very far. I’d like to say that I’m the brains and he’s the braun of this whole operation, but that’s not true, he’s really both.

We accomplished two raised beds in our front yard for easy access, because we have no door out to the back yard. We planted 2 types of tomatoes, 3 types of onions, 5 types of lettuce, bell peppers and herbs. I wanted to make cinder block raised beds, because I’m a little obsessed with cinder blocks at the moment, but we still had a lot of broken concrete available. It’s free, so we went with that. Normally raised beds are made with wood, but cinder block is $.80 a piece. Wood is expensive.

Here’s are examples:

Instead of going to buy cinder blocks, we decided to use up the rest of the concrete pieces that we used to make our patio. We didn’t use any mortar, just piled them and filled it with dirt. We threw a railroad tie on their for good measure. We also used the bathtub that housed the kegs for our wedding, as our herb bed. We used regular soil from around the ranch, but we put mulch on top. I’ve done a small amount of gardening in my life, mostly herbs, so I’m planting this garden while asking as many questions as possible and consulting a garden book. Phillip, on the other hand has been gardening for a while and knows way more than I do. He explained that Mulch helps keep the moisture in, especially with raised beds because they tend to dry out quickly. Make sure to use mulch that has been sanitized, because you don’t want to plant veggies in cow manure. Ew.

Inspired by a recent article in Better Homes and Gardens magazine, where a garden was featured with a small raised bed of different types of lettuce. So we planted six different types of lettuce, from Kale to Radicchio! They are a cold weather crop, so we are taking advantage of whatever cool weather we have left here in SoCal. It usually stays pretty moderate until June/May.They can be planted pretty close together and will look really neat when they are all full and different shades of green and purple.

Herbs in a tub. I’m going to add to this, but these basil and cilantro plants will become big bushes soon. I’m going to continue to plant around the tub to make it look good. Right now it just looks like a tub, in the dirt.

While at the local nursery, I also caught a glimpse of something we could make for our garden area. Bird houses!

Raised beds

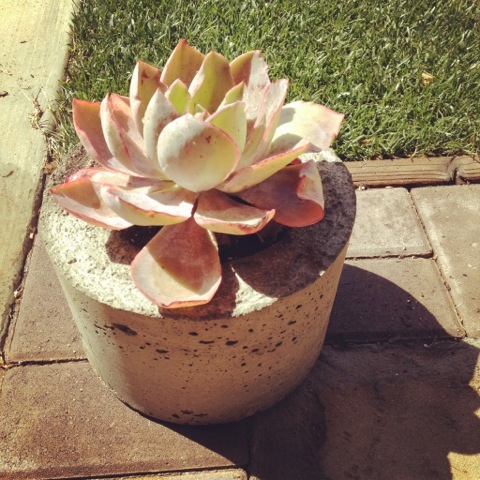
I also began making concrete planters. First it started with a pin on Pinterest… it always does. Then Phillip told me how to do it. Then I did it and it came out perfect. Now I want more. I recently bought a big bucket from Target and I’m going to make a huge planter with it. The equivalent of this in a ceramic or terra cotta pot is over $100. Cement is cheap, easy and you can dye it colors! I’ll show you what I have so far, keep your eyes pealed, I’ll post on how to make them soon. I’m trying to find fun and creative things to use as molds, to pour the concrete in. Let me know if you have any suggestions.

20120326-091650.jpg


DIY concrete pots.

On another note, we bought more chickens! We are now up to eight! Our neighbor gave us an old chicken coup so we are in the process of fixing it up a bit. As soon as the little chicks are big enough, we’ll put them outside with the rest. Our goal is to be able to have an abundance of eggs to give away and/or sell. These chickens get to run around and eat grass and bugs all day… don’t they sound delightful? Really, they produce some of the richest colored egg yolks I’ve ever seen! See the comparison between store bought yolks and ours. The egg on the far left is from one of Phil’s mom’s chickens.

A local feed shop had a “chick” day, where they sold 1,000 chicks on a single Saturday! Tis the season!

20120326-091758.jpg

We have also started construction on our climbing wall for the inside of our garage. Yes, it seems disjointed to have a rock climbing wall on a ranch, but that’s the way it goes. We are urban dwellers living in the sticks remember? Going to the climbing gym all the time is a good way to work out, but it gets expensive and time consuming. We plan to put up a “traverse” wall in the garage so we can get a quick work out in. We can also arrange the climbing holds in various ways so we can work on particular movements/weak areas. We don’t know how much we are going to put into the wall, but for now the plan is just a short traverse wall so we can climb back and forth to get a good workout. I can’t wait to post pictures.

Climbing wall construction begins!

I’ve got so much more to talk about, but it’s best in small doses, no? I’ve got a ton more lined up and many projects underway!

***

Update: I did it!!

Repurposed. Worth it?

I must admit, “re-purposing” or “DIYing” stuff sounds like a ton of work and not worth the outcome. However, we’ve recently finished a couple of projects and it has reinforced my opinion that it’s totally worth it! Sometimes it’s hard to navigate what tools to use, how to use them and when to use them if you are unfamiliar with the medium with which you are working. The good news is there are so many resources online that make it possible to pick a project, do a little research and come out the other side pleased with your project. You’ll have the joy of creating and might even spend less money than buying your project new.

Remember the old door head board we wanted to do? Well, we finished it and we think it looks great! Before the wedding, as we were cleaning out the shop, we scored an old closet door. It came complete with an old door knob and key hole! We set it aside to use as our headboard way back in October and finally finished it last month.

How about you? Have you recently begun or finished a DIY project? I’d like to see what you’re working on. Show me your DIY project photos on Twitter or Instagram. Tag them with ‘#mydiylife‘ in the comment or caption section. Look for this hashtag if you wanna see what other people are doing too. It’s just getting started, so be sure to tag your pictures.

If you have an iPhone, you have to check out Instagram. It’s a free, photo sharing app that is a lot of fun. You can create your own “page” of Instagram photos: http://Instagrid.me. Here are all my Instagram photos: http://instagrid.me/tumedianaranja/. Once you tag your photos in Instagram, check out the album http://instagrid.me/tag/mydiylife/. Fatmumslim has created a cheat sheet for Instagram. Fun. You can also participate in her March Photo-a-day project on Instagram. I just learned about it and I’m excited to start! Today is “a smile”, so keep your eyes pealed for a good shot. :D

Old Door Headboard
Old Door Headboard

Old Door Headboard
Old Door Headboard

How to make the door headboard:

Project time: 3-4 hours.

Cost: $50-90

Door. See my old post for tips on how to get a great old door cheap or free.

Electric sander $35

Primer $10-15

Paint $10-15 (see below for tips on how to get paint for cheap)

Sanding sponge $5

Mounting hardware $15

1. Sand. We used this electric sander. It’s one of the cheapest sanders you can buy at Home Depot, but it works to lightly sand surfaces in order to prepare them to be repainted or stained. Down side is you have to buy special Velcro sandpaper pads made for the shape of this sander. Other more expensive sanders have clips so you can attach regular sandpaper. One project blows through one or two of these pads, so buyer be aware. We also used a sanding sponge for harder to maneuver areas, such as grooves, holes, etc. It’s a very handy tool that works better than trying to do the same job with a flimsy piece of sandpaper.You don’t need an electric sander, you can just use 100 grit sandpaper. It will double or triple the time it takes to sand the surface. Sanding took about 1 hour for the whole front side of the door. I left the back as is, because no one will see it up against the wall. We wiped it down with a damp cloth to remove the dust from sanding.

Old Door Headboard

2. Primer. You must paint your surface with primer for a number of reasons, some of them outlined here. Use a quality latex primer. They also have spray primers available that make the job a little quicker, just spray light and even so it doesn’t drip. Let it dry for maybe an hour or two, depending upon how dry and hot it is where you are, it may take longer in wetter areas.

Old Door Headboard

3. Paint. Use a semi-gloss paint if you want it a little glossy and a flat paint if you want it to have a more matte finish. We used a semi-gloss interior latex paint (left over from a bathroom I painted years ago). Check garage sales, Craigslist and “Oops” paint at home improvement stores for used paint. Once we picked up 5 cans of paint in an assortment of great colors off of someone’s lawn (it had a “free” sign on it, FYI). You can’t simply throw away paint, so many people try to give it away to avoid dealing with it. My experience with oil based paint is minimal, because it smells bad so I stick with latex.Let it dry and attach your mounting hardware.

4. Mount. Now here’s where you have to decide if you want it to attach to the wall or the bed frame. I decided that the wall was a better option, because it’s a heavy door and would probably be more stable attached to the wall (and it’s easier). We purchased 2 wall mounts to secure the door to the wall centered above our bed.  You can probably use just one of these mounts with some stick on bumpers to prevent the door from wobbling.  Done! Take a picture and make sure to show me how it turns out! :D

Old Door Headboard
Old Door Headboard

***

A friend and I also started a couple wood spool coffee tables that are just about complete. It was really easy to do, but took a lot of sanding. I’ve always wanted to make a wood spool coffee table and one of the first project questions I ever asked Phillip was whether his dad could get a wood spool for me. Recently a friend of mine pinned a really clever spool coffee table/bookshelf idea on Pinterest and I got the bug again. A friend of ours is an electrician and knew of a local business that deals with heavy cable and wire. We name dropped and got access to a whole back alley full of these industrial spools. There were spools of all sizes, some coffee table size and some dinner table size. I imagine that if you are looking for a spool, ask around and see if you can’t find an electrician in the area that can locate some for you.

Here is a sneak preview of the project. I’ll post the complete how-to in a week or so.

Table 1: Stained.

Spool Coffee Table

Table 2: Painted (just primer in this shot, it still needs paint).

Wood Spool Table

***

Last but not least, I have some plans to re-purpose some thrift store finds. I have a few things already, but I’ll be making a thrift store trip soon. I’m crossing my fingers that I find either some flowy dresses or skirts. Keiko Lynn’s got the idea here (also notice the abundance of rings). Love it.

Thakoon Addition skirt(see more long skirts)

Here’s my latest thrift store find that I’ll be altering soon.

Blue Dotted Dress

Phillip looked at me like I was crazy when I bought this, but I have big plans for it. The buttons on the back are my favorite part.

Dotted Blue Dress